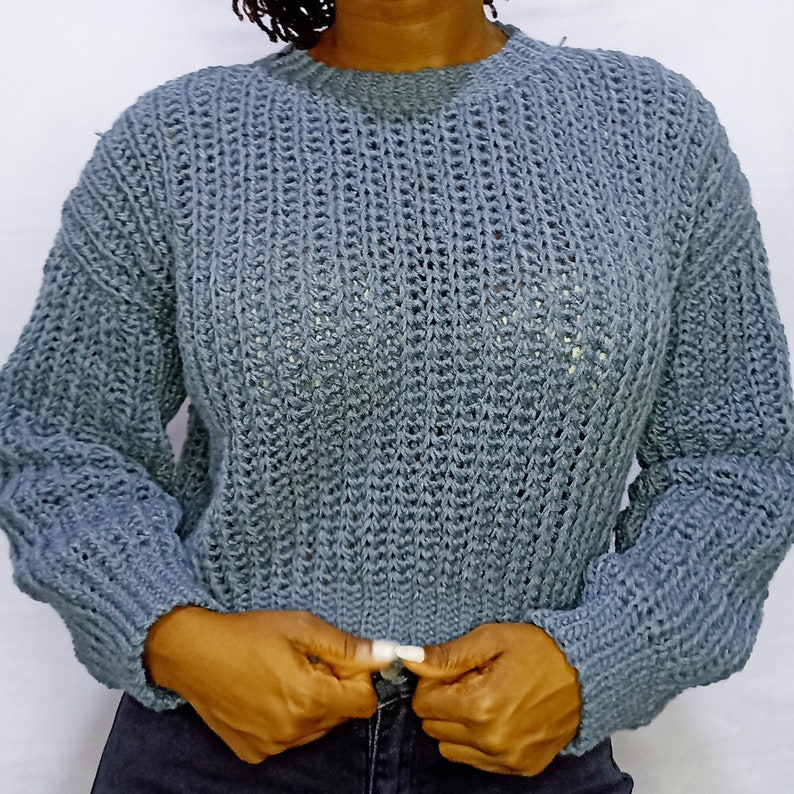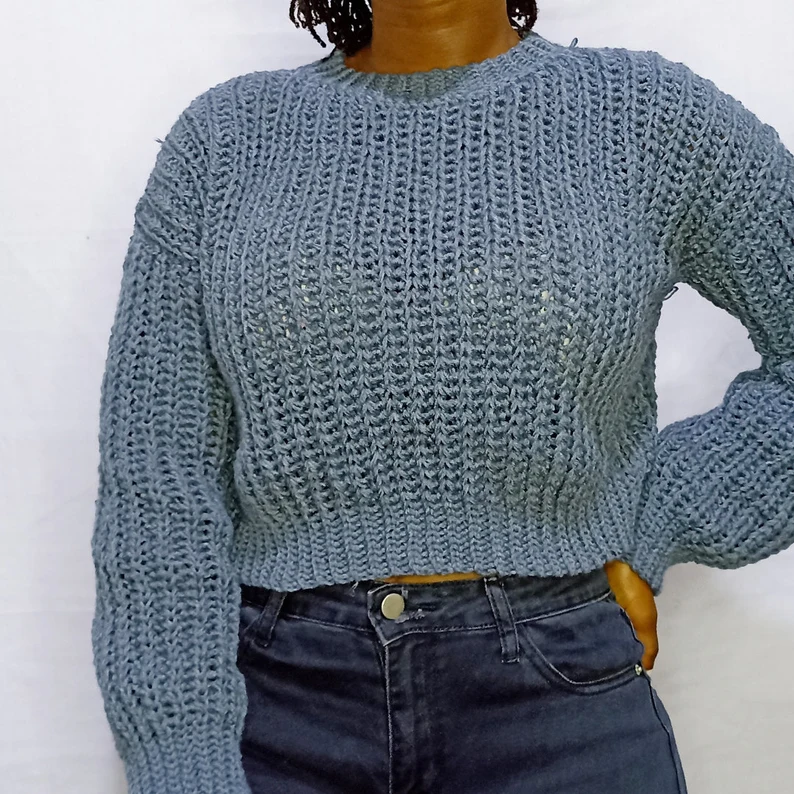
This crochet crop sweater has been crawling up on me for a while, and i just had to give in. What can i say? I am in love. It surely reminds me of my other Crochet Peach crop sweater. If you have never purchased a PDF Pattern from us then you are missing out for sure, but now is your chance while the 40% discount is still running!
Be sure to check out the shop and show us some support. While on that note, there are some affiliate links int his post which makes me a small commission at no added cost to you should you decide to purchase some yarn.

This crochet crop sweater pattern has a downloadable PDF available incase you want ot keep the pattern for future use.
The Facebook group is always open for new contributors, show us your work and tag us on Instagram as well as Pinterest
As usual, my inspiration to crochet sweaters comes from a lot of knitting projects i see around that are just so beautiful but i could never knit. But there is nothing a crochet hook fails to do.
This crochet crop sweater will be done within the week, and nobody will be looking like you when you go out! That is just awesome.

DIFFICULTY: Intermediate
TERMINOLOGY: US
MEASUREMENTS:
Gauge: 16 stitches in 14 rows 4”X4”
Sizes :XS, (S, M, L, XL ,2XL ,3XL ,4XL,5XL)
materials
so remember, i make a small commission from your purchase, so be sure to use my link….. Thank you!!!!
-
5.0mm Hook
-
4.00 mm hook
-
Stitch marker
-
Worsted weight Yarn
-
Measuring tape
-
Scissors
-
Darning needle
amount of yarn needed
-
4 balls of 100g worsted weight yarn for XS
-
5 balls for S,
-
6 balls for size M,
-
8 balls for L,
-
9.5 balls for XL,
-
11 balls for 2XL,
-
12.5 balls for 3XL, 1
-
14 balls for 4XL,
-
15.5 balls for 5XL.
Stitch Library
-
Hdslst- Half Double Slip Stitch
-
Ch- Chain
-
Bl-Backloop
-
St- Stitches
-
Rep- Repeat
-
Decr- Decrease
-
Incr- Increase
-
Tog- Together
GOOD TO KNOW
Take note that the pattern is worked in the back loop only throughout.
The sweater is worked using half double slip stitch, a video tutorial is available incase the stitch is new to you.
We will begin by working the round collar before we start on the body and then we will attach the body to the collar as we work the crochet sweater.
The chaining of one does not count as a stitch.
CONSTRUCTION
I do my level best to limit the use of the crochet needle because i cannot stand sewing pieces together, it takes away my joy LOL. So we eliminate that as much as we can.
The only sewing you will do in this crochet sweater pattern is to connect the sides, and close the arms, and shoulder. That is all. Unless you count weaving ends in sewing.
So we will begin by making the collar, and then we will start to work on the body shoulder which we will then connect to the collar as we work, this will be done for the front and back panel. Then, we will sew the sides closed leaving the arm holes open, connecting to one of the armhole opening (in the underarm section,)
we will make a chain long enough the length of out arm and then we will begin to work the sleeve, the sleeve will be worked on the body of the sweater as we will be connecting with a slip stitch to the sweater arm opening. Then we will sew the sleeve close, repeat the same for the other side and your crochet sweater is all done!!!.
SIZING GUIDE
The sizing guide follows size XS(S, M, L, XL, 2XL, 3XL, 4XL,5XL) E.g. “Ch 41(41, 45, 45, 49, 49, 53, 53,… ) means Ch 41 for XS, Ch 41 for Small, Ch 45 for Medium, Ch 45 for Large, Ch 49 for XL, Ch 49for 2XL, Ch 53 for 3XL, Ch 53 for 4XL… etc
PATTERN
THE COLLAR
To work the collar, using the 4.00 mm crochet hook, begin by making a ch of 6+1 for all sizes. Slst in to the second ch from the hook in the back bumps of the ch, and slst all the way down. Ch 1 at the end and turn. From here onwards, we will slst in to the back loops only to create the ribbing effect.
Slst into all the back loops, ch 1 and turn at the end. Rep this for 60(60,80,80,120,120,140,140,160) rows. Now ch 1 and place a sc into every side slst row, your sc at the end should match the number of rows you made. Then sew the collar closed with the other end to make the circle, ch 1 and cut. Lay the collar aside so we can start working on the body.
ROW 1: With the 5.0mm hook, Ch50(55,60,65,70,75,80,85,90) +1. Working into the back bumps of the chain.
Into the second ch from the hook, hdslst, hdslst all the way down leaving 10 ch at the end, in the last 10 ch, slst still using the 5.00 mm crochet hook. ch 1 and turn. Be sure to place a stitch marker where the slst start.
ROW 2: in to the back loops only, place 10 slst , at the stitch marker, switch to a hdslst. Hdslst all the way to the last st, ch 1 and turn, ch1 does not count as a stitch remember that.
ROW 3: hdslst into all the st till the stitch marker and switch to the slst into the last 10. Rep rows 1-3 till row 12(16,20,20,28,28,28,32,32). However, in the last 2 st, place one hdslst together so as to make our first dec. Do not chain one to turn, slst into the first stitch marked sc of the collar, to connect the row, to begin the next row, slst into the next sc and turn, into the first two st, place a hdslst tog to decrease again.
Finish the row as normal, ch 1 and work back up. In the last two st, place another decr. Cont to decr for 10(10,15,15,20,20,25,25,30). After this, work the next 10(10,10,10,20,20,20,20,20) rows normally. And then finish the front of the collar with 10(10,15,15,20,20,25,25,30) of increases.
To fo the increase, you will place 2 hdslst into the last st before connecting to the collar, and the first st when working down after connecting to the collar. After here, you will ch 1 as normal because we are now gonna work the other shoulder portion, so work 12(16,20,20,28,28,28,32,32) normal rows, then ch 1 and cut. We are done with the front panel.
BACK PANEL
ROW 1: With the 5.0mm hook, Ch50(55,60,65,70,75,80,85,90) +1. Working into the back bumps of the chain.
Into the second ch from the hook, hdslst, hdslst all the way down leaving 10 ch at the end, in the last 10 ch, slst still using the 5.00 mm crochet hook. ch 1 and turn. Be sure to place a stitch marker where the slst start.
ROW 2: in to the back loops only, place 10 slst , at the stitch marker, switch to a hdslst. Hdslst all the way to the last st, ch 1 and turn, ch1 does not count as a stitch remember that.
ROW 3: hdslst into all the st till the stitch marker and switch to the slst into the last 10. Rep rows 1-3 till row 12(16,20,20,28,28,28,32,32). Do not chain one to turn, slst into the first stitch marked sc of the collar (This will be the one next to the place we made the first slst of the front panel), to connect the row, to begin the next row, slst into the next sc and turn, into the first two st, place a hdslst. Finish the row as normal, ch 1 and work back up. Continue normal rows, no decreasing and increasing for the back for a total of 30(30,40,40,60,60,70,70,80) rows, then finish the other shoulder portion with the last 12(16,20,20,28,28,28,32,32) rows.
Sew the sides, leaving enough room to fit your arm, you may try this on and see what size you prefer, or you may follow the instructions. Leave 15(20,20,25,25,30,30,30,35) ch for both the front and the back panel to make space for the sleeve, and close the rest of the sweater. Do this for both sides.
SLEEVES(MAKE 2)
Connecting your yarn to the armpit section or underarm of the collar, ch 45(50,55,55,60,60,65,65,70) +1, into the first 10 ch, with the 5.00 mm hook in the back bumps of the ch, slst till the tenth stitch. Then switch to the hdslst,when you reach the arm opening, the sc rows should be visible, slst to the next available sc to join the row, slst to the next available sc to start the new row.
Rep this till the arm/ sleeve is complete, sew it shut. Rep the same for the other side.
Weave in all the ends that are sticking out and your V-neck off the shoulder sweater is all done!!!!